Betty Crocker Wannabe has MOVED! I am now blogging solely at A Simply Klassic Home. I am still sharing printables, party ideas, and other inspiration. It's much more streamlined and clean. I hope you will stop by and say follow along there! I have lots of ideas for new printables coming this holiday season!!
Showing posts with label Crafts. Show all posts

Monday, November 22, 2010

Handmade Christmas Gift Idea

What do you get when you put this:


together with this:


?
?
?
?
?
?
?
?
?
?
?
?

Root Beer Reindeer!


When I saw these on Fingerprints on the Fridge, I knew I had to make them. I have been trying to come up with something clever to give to Cooper's preschool teachers, and since there is a staff of nine who all work with each class, I knew it had to be something cute and on the cheap!

Total cost for this project:
$3.60 per six pack (on sale at Ralphs)
Packs of pipe cleaner, google eyes, and pom-poms (about 100 each): $10
Total cost was a little $40 for nine six-packs, or about $4.70 per six pack. 


Less than $5  per person and I have a super adorable treat for each of the wonderful teachers to show them our appreciation. It would be a great activity for the kids too!

Linking up to some of these great parties.

Sunday, November 14, 2010

Chocolate Covered Marshmallow Reindeer

I had a lot of ideas in my head of projects I wanted to try out this holiday season, and this is the one that has won out as my favorite so far. My Chocolate Covered Marshmallow Pumpkins were so incredibly popular, that I knew I needed to come up with some new ideas for Christmas...and probably for every season afterward! (Can you say, Chocolate Covered Peeps??? YUM!!!)


I am giddy with excitement at how cute these turned out!!!

Want to make your own?

Here's what you need:
Large Marshmallows (I prefer Jet-Puffed over the store brand)
Lollipop sticks, popsicle sticks, or pretzel sticks
Ribbon
Melting Chocolate (I prefer the ones you buy at the craft store for their smooth texture)
Cinnamon dots, Hot Tamales or Mike & Ike's Reds
Small Pretzels
Pearl Sprinkles (or other candies for the eyes)
Foam block 


First, set up your assembly line.

Break the pretzels in half. It was not an easy task to get them all to break properly, so make sure to have plenty on hand. You need two halves for each reindeer's antlers.


Snip just the ends of the Hot Tamales or Mike & Ike's, or count out your cinnamon dots. I used the Mike & Ike's because I'm planning to give these to Cooper's preschool class, and the cinnamon ones are a little too spicy for him.


Put the marshmallows on the stick, and push them into the foam block. This saves you from having to do that with melted chocolate on them. (Since this was only a trial run, I was working with what I had on hand. I'm going to purchase a larger block next trip to the craft store.)

I scored the tops of the marshmallows, hoping that would make it easier to attach the pretzel antlers.


Once your assembly line is set, it's time to melt your chocolate.

Place chocolate melts or chocolate chips in a microwaveable glass bowl. Microwave on high at 20-30 second intervals, stirring each time until chocolate is just melted, but not too hot.


Dip a marshmallow into the chocolate, covering it entirely. Use the backside of a spoon to smooth out the side and top, and to remove any excess. Place it back into the foam block and repeat the process on the next marshmallow.


After about five or six marshmallows, add the pretzel antlers, by gently inserting them into the scored parts of the marshmallows, and hold them for a few seconds to make sure they are secure. This took some practice!


For the nose and eyes, you can either add them when the chocolate is still wet, or finish the whole batch, then dab some melted chocolate onto each piece and attach it to the marshmallow to make the face. I did it both ways, but decided the second way was easier.


Once they are completely dry, tie a small piece of ribbon around the stick like a scarf.


These would make great treats for neighbors, teachers, classmates or as party favors.Wrap in a plastic treat bag, and relish in the oohs and ahhs as you deliver them to your friends!

I participate in these parties.

Thursday, November 4, 2010

Pottery Barn Inspired Empty Frame Art & Card Display

I think we have created a monster.

I picked up a paintbrush for the first time in years. And I liked it. a lot. In fact, I've been wandering the halls of my house warning the mismatched picture frames that they're next.

As soon as I saw the Pottery Barn catalog that came out a few weeks ago, I started ripping pictures from it, storing ideas of things I wanted to knock-off for Christmas decor. I shared some of those ideas here.

This was one of them:


But with a hefty $200 price tag, I knew it was something I would never own. Then I looked to my right and saw a picture frame hanging on the wall. Sure, it had a picture in it, but this frame was just begging to be transformed. So I did.


I am so excited about how this project turned out. It's the first "big" project I've taken on in a long time.

Here's the original 16" x 20" frame:


First I sanded it down, not wanting to completely lose the dark color.


Next, I painted the frame Cottage White. I used a couple coats of Behr's Primer Paint (I actually bought a sample size for $2.94) and it worked great!


Once it was dry, I distressed the frame using both coarse and medium sandpaper.


Then I was ready to attach the wires. I purchased a picture hook kit at Home Depot that included picture wire, sawtooth hangers, picture hooks, and screw eyes for around $4.

I screwed in the eyes evenly spaced on the back of the frame.


Then I doubled up the picture wire, looped it through the eye and twisted it to secure it, making sure to hold it as tight as possible.


I kept the original hanger, and just screwed it back into the frame high enough and tight enough that once it was hanging it wouldn't be seen.


I hung it on the wall, and stood back to admire my work!


The entire project cost me about $7 for the paint and the picture hook kit. That's $193 cheaper than Pottery Barn!!

My original intention was to use it to display Christmas cards.


But then I thought it might be a great thing to leave up year round to use as holiday decor throughout the seasons.


I think that my favorite idea though, is to just hang a few black & whites on it.


What would you display?

Make sure to check back on 11/11 when I'll be posting a GIVEAWAY for personalized printables!


Linking to these great parties!

Monday, October 18, 2010

How We Got Through a Rainy Weekend

It's been a dreary few days here in the OC. What is usually a warmer time of the year, has turned wet and cold. We spent our Sunday indoors (much to the kid's disappointment). Usually on a day like this, I would be tying on my apron (ok, so I don't actually have an apron, but I'm sure I would look damn cute if I did). Anyway, I would probably be baking BUT since my oven is BROKEN, that didn't happen. Sooo, to combat the running around the house and jumping on the couch, I announced that we were going to make playdough. My son cheered and I was THE BEST MOM EVER. (Ok, so he didn't actually say that, but it IS true).

Since the You Capture challenge for the week is "ORANGE" I knew this was a perfect opportunity to create my subject.


Yellow and red make ORANGE.


"Children's games are hardly games.
Children are never more serious than when they play."
~MONTAIGNE, Essays


Photography 101 was taught by this guy (shown here with his ORANGE drink):


I'm slowly learning the buttons on the camera, and how and why to use them. My photos are a little grainy, but apparently that's because the ISO was set too high and the aperture too low. Or something like that.

And for those of you who have never made the easiest "toy" in the world, here's the recipe.

Homemade Playdough

3 cups flour
1 1/2 cups salt
3 cups water
1 Tblsp cooking oil
1 Tblsp cream of tarter
Your desired coloring (Food coloring, Kool-Aid packet, even Tempera paint will work)

Pour all ingredients into a pot and cook until the sides start to pull away from the pan, stirring intermittently. Let cool in the pan for a few minutes, them transfer to wax paper, or a large cutting board to cool (you don't have to wait for it to cool to start playing with it).

I didn't have any on hand, but I love using Kool-Aid packets, because it not only adds a beautifully vibrant color, but a great scent as well. You can also add different extracts to create your own scent (peppermint, lemon, vanilla, etc). Throw in plastic knives, rolling pins and cookie cutters and this is a great rainy day activity to keep your kids busy for hours!

Sunday, October 10, 2010

Chocolate Covered Marshmallow Pumpkins

At Cooper's preschool, the parent's are asked to bring treats for their Halloween parties, and the children go to the different classroom doors "trick or treating." I decided on chocolate covered marshmallows, since this is one of MY favorite treats!

Here's what I came up with:


These are super simple to make, and always a huge hit.

What You Need
Large marshmallows (I usually buy the Jet Puffed brand - the store brand ones seem to stick together more)
Melting Chocolate in your desired color (chocolate chips work well too)
Lollipop sticks
Your decorations of choice (ie. sprinkles, ribbon, etc.)

1. Stick the lollipop sticks into as many of the marshmallows as you are using, and set out on wax paper.


2. Melt your chocolate. You can use a double boiler on the stove, stirring constantly, or do it the easy way and use the microwave. Either way, the key is to stir, and not let it get too hot, as it will get thick and unmanagable. If microwaving, do so in 30 second intervals, sitrring every 30 seconds.


3. Dip your marshmallows in the chocolate, coating the marshmallow. Use a spoon to smooth, or run the sides along the side of your bowl to remove any excess.


4. If desired add sprinkes after each dip, because the chocolate hardens fairly quickly (if using chocolate chips, it takes a little longer).

That's it!


I added a green ribbon for the stem. I really like how they turned out, but I felt like they still needed something. I checked my pantry and came up with chocolate chips and toothpicks.


Adding the jack-o-lantern faces was not as easy as I thought it would be, but I'm pleased with the results. I hope the kids like them too!


Happy (almost) Halloween!

Monday, September 20, 2010

Cooper's Carnival Birthday Party!!

The weekend of Cooper's birthday passed as quickly as it came.

For his actual birthday, we celebrated with dinner at Goofy's Kitchen at the Disneyland Hotel. If you haven't been to a Character Dining Experience at either Disney Resort, you should! It's amazing, the kids thoroughly enjoyed themselves, and, while a little on the expensive side, it's well worth it. More of our family party in my next post.

Today is all about the big CARNIVAL PARTY!

Using inspiration from Adriana at and baby makes three as my jumping point, I planned and prepared for nearly four months, and I'm happy to say that the party went off without a hitch!!

I'm extra grateful to have some wonderful photographers on hand, Rick and his son Chris, who shot all of these wonderful photos. They are amazing, and Chris definitely shares his dad's talent for photography. Enjoy the pictures! (I will include a list of resources at the end).

STEP RIGHT UP, COME ON IN...


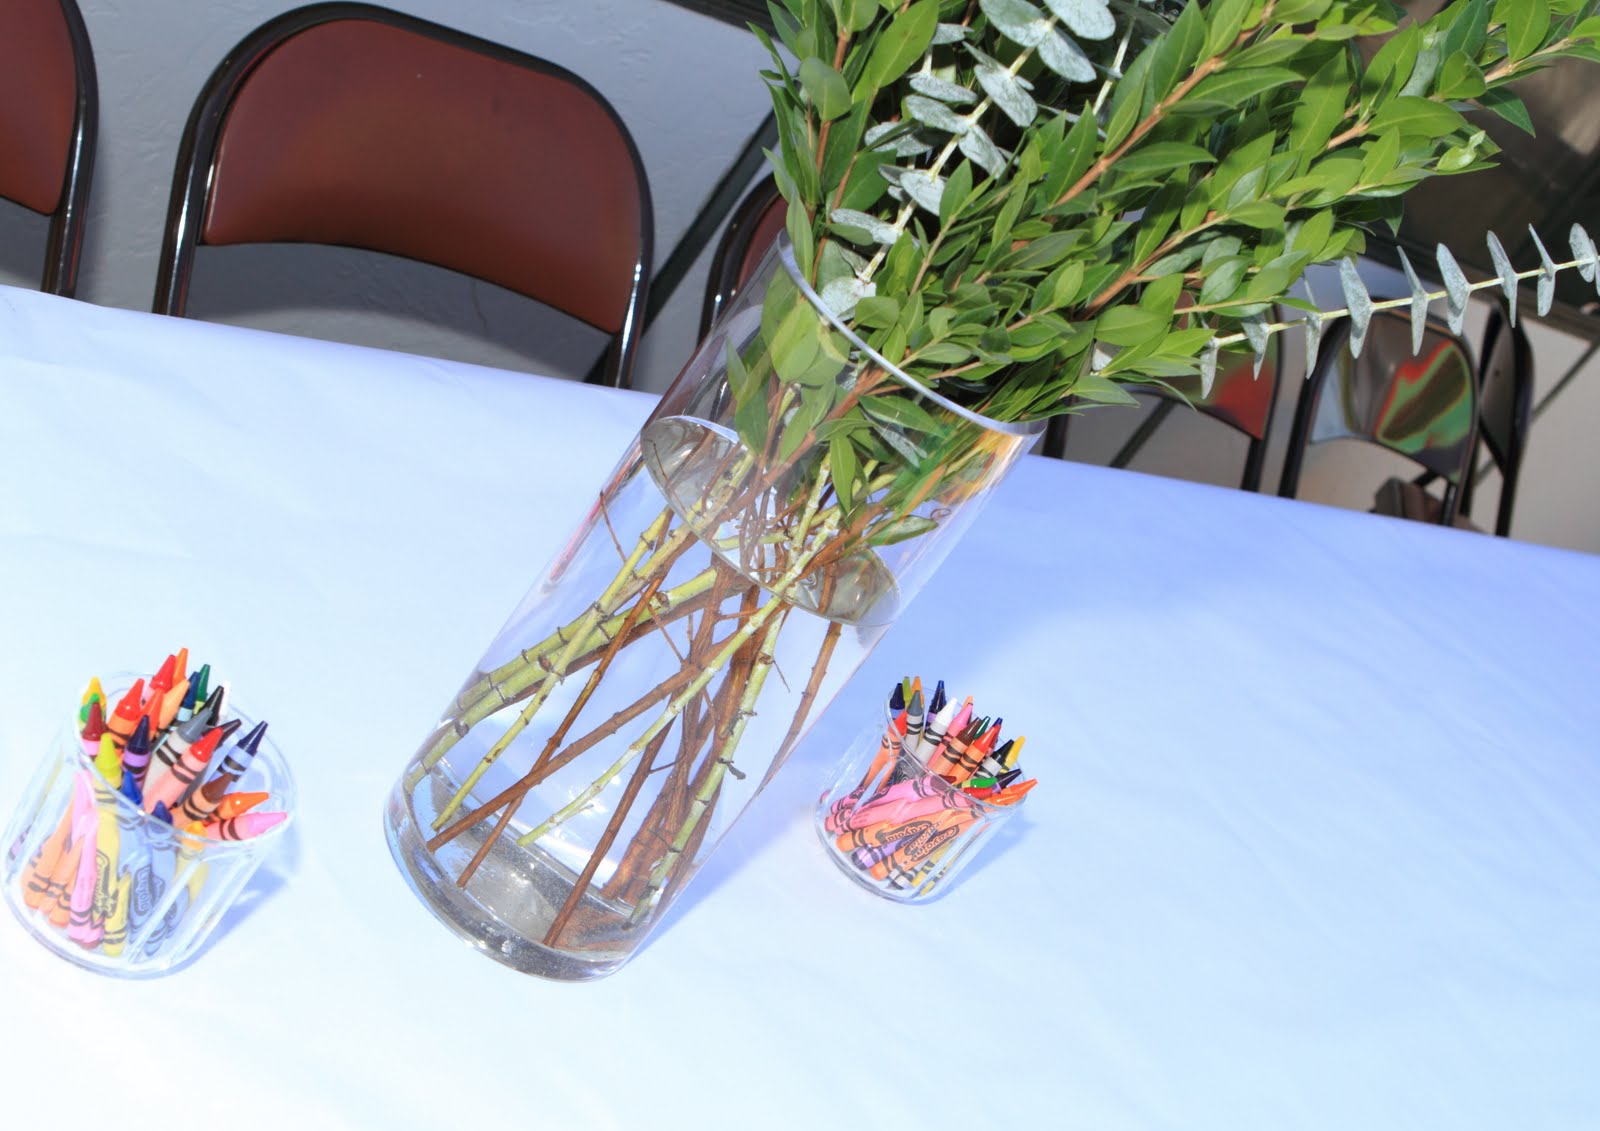
The tables were covered with yellow tablecloths and topped with white butcher paper. Centerpieces were just some simple greens in a vase tied with balloons. I set out crayons for a little creative expression.


Even the grown-ups enjoyed the coloring.


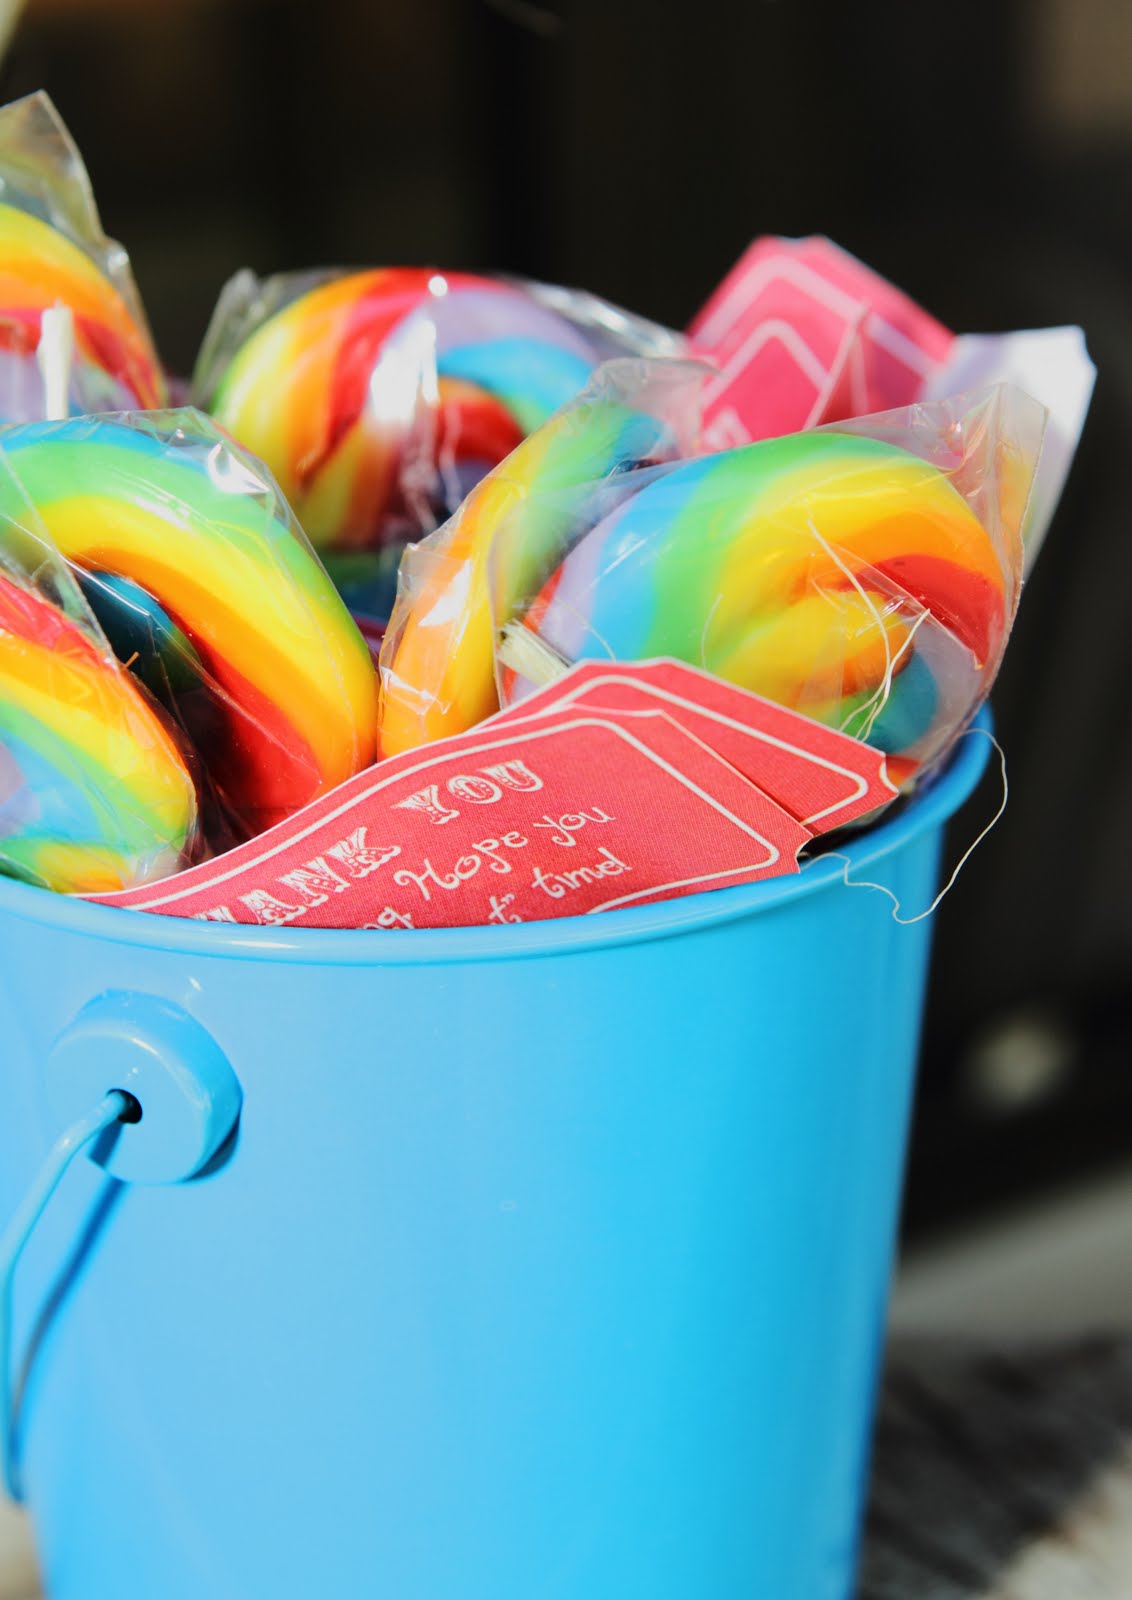
I placed some bright blue pails around the treat table, filled with candy. (the tags on the lollipops say "Thank you for coming. Hope you had a sweet time!").

The Menu:


The food was a hit! We cooked the hot dogs beforehand and wrapped them in foil to keep them warm. I also made a pasta salad for the adults (I'll be sharing that recipe soon - it's my favorite go-to for potlucks). Caramel apples were sliced apples with caramel dip.


Of course no carnival is complete without fresh popped popcorn! We filled retro popcorn bags with microwaved popcorn for our guests to munch on.


I found these red cups at Target, that came with lids and straws (not the ones pictured). $2.99 for 15! They were perfect for the cute clown straws I had purchased.

For the cupcakes I borrowed this three tiered stand from a friend, who found it at a local flea market.


It was perfect for displaying Mama's Homemade Cupcakes.


I made the cupcake toppers in Publisher. I printed them on cardstock, cut the two inch squares and attached them to coffee stir sticks with double sided tape.


I still wanted Cooper to have his own special cake, so I purchased a giant, plain cupcake at my local grocery store and iced it like a cake.


 Cooper thought it was pretty cool.


My friend Vanessa is multi-talented. Not only is she an amazing teacher and awesome Polynesian dancer, but she does some pretty fantastic face painting as well. Since she loves my Cooper too, she offered to provide face painting for his birthday party. She did an amazing job and we were so grateful!


 Cooper's Snake.


We also had a jumper to help balance out some of the quieter activities!


Even some of the mommies got in on the action...in dresses no less!


Yes, that's me, getting knocked down by a seven year with way better balance!

Now, for my favorite part of the party, we also had a Photo Booth! I saw a few of these around blogland and thought, "I can do this!" But, I didn't want to spend the money for fabric for the background that I would probably never use again. Then I remembered that Grandma has a cute polka dot blanket, and voila! Instant background! 

Everyone really enjoyed the photo booth, but I'll let the pictures speak for themselves!


I even kept Cooper's big birthday present to the "Carnival" theme:


Seriously, this Roller Coaster by Step2 is one of the coolest toys ever! The kids all had a great time taking turns on it.

To end the day, everyone got a party favor bag filled with carnival prizes to take home.


Cute Rice Krispie Treats courtesy of Grandma.

This party was probably the most detailed I've ever put on, and everyone had a great time! Cooper especially enjoyed himself - I don't think the smile left his face all day. I hope you enjoyed the pictures!!

Endless thank yous to Rick, my hunky partner in crime, who put up with three months of party planning and decor everywhere, my never-ending outbursts of "look how cute this!!" and who helped with everything from pick-up to set-up to clean-up. Thank you from the bottom of my heart to Chris for the amazing photography and willingness to take on any job that was needed of him (from bagging popcorn to decorating cupcakes), to Vanessa and Jennifer for their ideas and for being my cheerleaders, Kathryn for loaning us the cupcake stand, and Grandma for all of her help in making sure this party went off without hitch.


Resources:
Digital Party Pack (used for the party favor tags and Happy Birthday signs): Typewink on Etsy
Cooper's Birthday Shirt: Made Cute Just 4 U on Etsy
Framed Signs: Made in Publisher by me, using backgrounds from the digital party pack
Blue Buckets: Target (dollar aisle)
Roller Coaster: Amazon
Clown Noses: Small Toys

Party Favors/Prizes:
Clown Straws, Bird Whistles, Retro Popcorn Bags: Hey Yo Yo on Etsy
Ice Cream Shooters, Super Balls, Lollipops, Sticky Hands, Mini Pinwheels: SmallToys

Inspiration:

Linking to: