Betty Crocker Wannabe has MOVED! I am now blogging solely at A Simply Klassic Home. I am still sharing printables, party ideas, and other inspiration. It's much more streamlined and clean. I hope you will stop by and say follow along there! I have lots of ideas for new printables coming this holiday season!!
Showing posts with label baking. Show all posts

Sunday, December 19, 2010

It's Because I Love You...

That I set aside some time to share some A.MA.ZING cookie recipes with you. It's Christmas cookie time at the Betty Crocker Wannabe house.

Now, before we begin, I have to warn you this is kind of a long post. BUT, instead of making you come back tomorrow, and the next day, and the next day, I have included four incredible cookie recipes. Aren't I nice? And of course there are some pretty tempting photos as well. So there's that.

I've already packaged all of the cookies up and will be delivering them to friends and neighbors tomorrow.


Along with some yummy chocolate covered marshmallows.


You wanna know what's in the tin? Ok, here we go!

~ Cookie #1: Apricot Shortbread Cookies ~

I found the base recipe here. I knew when I saw it, that the author was right - these ARE dangerous, because as she states, there are only four ingredients in the base recipe: butter, sugar, cream cheese and flour.

I know, right?

I had actually been looking for a good shortbread cookie recipe that I could make with apricot jam, because after I tried the ones at Corner Bakery, I couldn't stop thinking about them.

Unfortunately,all of the recipes I found had almond extract, and if you been reading this blog for a while, you know that we are now a NO NUT family. So, when I saw this recipe, I knew that it could work.

The recipe is just a basic one, and calls for add-ins, but I decided to make them thumbprint style instead.


Apricot Shortbread Cookies
1 cup butter, softened
2 cups sugar
1-8 oz block of cream cheese, softened
2 1/2 cups flour
Apricot preserves
Powdered Sugar for dusting (optional)

1. Preheat oven to 325 degrees.

2. Cream butter and sugar together; add cream cheese and mix until well incorporated.

3. Add flour (2 cups for a more delicate cookie, 2 1/2 cups for a firmer, chewier cookie)

4. Shape into one inch balls and place on your cookie sheet, 2 inches apart.

5. Using the end of a wooden spoon, or your finger, make an indentation about halfway into the dough.

6. Fill the holes with preserves.

7. Bake for around 20 minutes, until just beginning to brown.

8. Remove to wire rack to cool, and dust with powdered sugar.


I think it makes about three or four dozen, but I can't be sure, since Rick ate quite a bit of the dough. Yes, it's THAT good.

This is just a basic recipe, you can experiment with any add-ins you wish - I'm thinking white chocolate chips and cranberries.

Oh, wait, here they are:


To the base recipe I just added one cup of white chocolate chips, and one cup of dried cranberries.

~ Cookie #2: Mexican Hot Chocolate Cookies ~

I found a recipe last year for Mexican Hot Chocolate Cookies that I wanted to try. Only, I couldn't find Mexican Hot Chocolate tablets at my local grocery store, and I really didn't feel like dragging my toddler around to Mexican markets to find them.


So instead, I modified the recipe. I added 1/3 cup of cocoa and a teaspoon of cinnamon.


Mexican Hot Chocolate Cookies
1/2 cup butter (1 stick), melted
1/ cup cocoa powder
1 tsp ground cinnamon
1 package Betty Crocker Sugar Cookie Mix
1 egg
1 cup mini chocolate chips
1 tsp ground cinnamon
1/4 cup white sugar

1. Stir cocoa powder and 1 tsp cinnamon into melted butter. 

2. Add sugar cookie mix and egg and mix well.

3. Stir in mini chocolate chips.

4. In a separate bowl, combine sugar with 1 tsp cinnamon.

5. Shape dough into one inch balls, and roll in cinnamon sugar mixture.

6. Place 1-2 inches apart on ungreased cookie sheets, pressing down slightly with the palm of your hand.

7. Bake for 8-10 minutes in a 350 degree oven, careful not to overbake (I mean really careful. A minute too long and they will be hard as a rock by the next day).

8. Remove to wire rack to cool.

~ Cookie #3: Rich and Creamy Fudge ~

Ok, so it's really not a cookie recipe, but it's a Christmas classic and a must-make at my house. I haven't had much luck with the true candy recipes (mostly because I don't want to buy a candy thermometer), and this recipe gets pretty close, even though it uses marshmallow creme.


Rich & Creamy Fudge
1 (7 ounce) jar marshmallow creme
1 1/2 cups white sugar
2/3 cup evaporated milk
1/4 cup butter
1/4 teaspoon salt
2 cups milk chocolate chips
1 cup semisweet chocolate chips
1/2 cup chopped nuts
1 teaspoon vanilla extract

1. Line an 8x8 inch pan with aluminum foil. Set aside.

2. In a large saucepan over medium heat, combine marshmallow cream, sugar, evaporated milk, butter and salt. Bring to a full boil, and cook for 5 minutes, stirring constantly. 
(the key here really is to keep stirring the entire time you are bringing it to a a boil and after it boils. And watch for splatters - don't ask me how I know).

3. Remove from heat and pour in semisweet chocolate chips and milk chocolate chips. Stir until chocolate is melted and mixture is smooth. Stir in nuts and vanilla. Pour into prepared pan. Chill in refrigerator for 2 hours, or until firm. 


(Have I mentioned how happy I am to have my oven working again???)


Monday, July 12, 2010

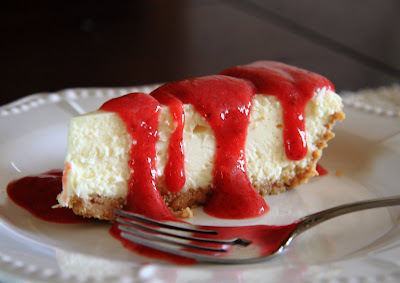
Cheesecake Fail, Cheesecake Success!

The man recently informed me that he loves cheesecake. Why he never told the lady who loves to bake, I have no idea. So, for his birthday this year, I decided I was going to make him a cheesecake. Since we were having a couple of people over on the 4th of July, I figured that would be a good time to make it, since his birthday was just a few days later.

Did you know that there are about 100 completely different cheesecake recipes with completely different ingredients? Sheesh.

I've never made a cheesecake before. Love to eat them, never made one. I googled "strawberry cheesecake" and picked a recipe that I thought I could do.

I failed.

BUT (yup, there's a but) I figured out what I did wrong, searched for another recipe, and tried it out the night before his birthday.


Oh yeah. Please do not lick the computer screen.

New York Style Cheesecake with Strawberry Sauce

1 cup granulated sugar
3 pkgs. (8 oz. each) cream cheese, softened
1 teaspoon vanilla extract
2 eggs
1 8-ounce carton of sour cream
1 ten inch graham cracker crust

*All ingredients should be at room temperature.
Cream the softened cream cheese with the sugar and vanilla extract. Add the eggs one at a time, beating thoroughly after each addition. Add the sour cream. Pour into graham cracker crust, and bake for half an hour at 350 degrees F. Turn off the oven, leaving the cheesecake inside for another half hour. Cool and refrigerate for at least 4-8 hours.

Strawberry Sauce
4 cups strawberries (fresh or frozen & thawed), sliced
1/3 c white sugar
1tsp cornstarch (optional)

Heat strawberries and sugar over medium heat until the mixture starts to boil. Turn the heat down to a low simmer and continue to cook until the sauce begins to thicken. This can take up to 20 minutes. Mash the berries a bit as they cook. Use cornstarch to speed the thickening process if you like, but make sure to dissolve the cornstarch in a little water before placing into the sauce and don't go overboard with it. Be patient with the thickening time or you will end up with a gloppy mess from too much cornstarch. I didn't need the cornstarch.

Puree the topping in a blender until it reaches your desired consistency. If you would like a chunkier topping, take 1 cup of the strawberries out before you begin to puree. I pureed all of it, I like the smoother sauce.

Oh, and here's a one of my favorite recipe searching hints: put "easy" in front of the recipe you're searching for. It totally works.

Saturday, July 3, 2010

Oh So Yummy Cinnamon Muffins

Since I love to bake, I try to do something in the kitchen every weekend. This morning I woke up and decided I was going to make some muffins...but didn't really have much on hand. No fruit, no nuts. What's a girl to do?

I searched online and found a few recipes for Cinnamon Muffins. Perfect! I combined a few recipes and this is what I came up with. They were very tasty, and everyone loved them!


Cinnamon Muffins:
1/2 cup flour
1/4 cup white sugar
1/4 cup brown sugar
2 tsp baking powder
1/2 tsp salt
3/4 tsp cinnamon
1 beaten egg
1/2 vegetable oil
1/2 cup milk

Topping:
2 Tbsp brown sugar
2 Tbsp flour
1 Tbsp cinnamon
1 Tbls melted butter

Preheat oven to 400 degrees. Grease muffin pan.
Sift all of the dry ingredients together.
In a separate bowl, mix the wet ingredients.
Fold wet ingredients into the dry and mix just until blended, careful not to overmix.
Pour batter into muffin cups.
Mix ingredients for topping. Sprinkle over muffins.
Bake for 15-20 minutes.


Just Something I Whipped Up

Sunday, June 13, 2010

Makin' Whoopie (Pies)

It's Mono Monday and the topic is ecstacy.

Definitions:
1. Intense joy or delight.
2. A state of emotion so intense that one is carried beyond rational thought and self-control.
3. a state of elated bliss.

This was kind of hard for me, since it's such an intense emotion, and I was having a hard time figuring out how to properly convey that in a photograph.

Then we baked these.


These, my friends, are Whoopie Pies. Intensely decadent, cake-y, chocolate cookies with ooey-gooey marshmallow centers. Heaven. Bliss. Ecstacy.

Here's the recipe:
Even though it seems as though there are a lot of steps, it was incredibly easy.

Ingredients
2 ounces unsweetened chocolate, chopped
4 ounces semisweet chocolate, chopped (I used chocolate chips)
1/2 cup butter (1 stick)
1 cup sugar
3 large eggs
1 teaspoon pure vanilla extract
1 cup all-purpose flour
1/4 cup natural cocoa powder, such as Hershey's or Scharffen Berger
1/2 teaspoons baking powder
3/4 teaspoons fine salt
18 large marshmallows, (not minis)

Preheat oven to 375 degrees F. Line a baking sheet with parchment paper or a silicon baking sheet.

Put the unsweetened and semisweet chocolates and butter in a medium microwave-safe bowl; heat at 75 percent power until softened, about 2 minutes. Stir, and continue to microwave until completely melted, about 2 minutes more.

Whisk the sugar, eggs and vanilla into the chocolate mixture until smooth.

Sift the flour, cocoa, baking powder and salt into another bowl. Gradually whisk the dry ingredients into the wet ingredients until moistened. Switch to a rubber spatula and finish folding the batter together; take care not to over-mix.

Use a small cookie scoop or spoon to drop a heaping tablespoon of batter onto the prepared pan. Repeat to make 36 cookies, spacing them about 1-inch apart. Bake until the cookies spring back when lightly touched, about 6 minutes. (It took about 7-8 minutes for - DO NOT under-bake).

Cool the cookies slightly. Transfer half of the cookies to a rack. Turn the remaining cookies on the pan over, so they lay flat side up. Place a marshmallow on top of each flipped cookie and return pan to the oven. Cook just until the marshmallow begins to soften and puff, about 2-3 minutes. Cool marshmallow topped cookies slightly, about 2 minutes. Top with the remaining cookies, pressing lightly to make sandwiches. Cool whoopee pies completely on wire racks. Serve. (Do not top the marshmallows too soon, or the cookie will slide off as it cools.)


These are superbly chocolatey goodness that is so rich and yummy you will want to eat them all. Thankfully, I had the good sense to share some with a friend, otherwise we would have!

I'm also linking up to Just Something I Whipped Up

Thursday, June 10, 2010

For the Love of Dump Cake

I am not big on sweets. I keep ice cream in the freezer, and cookies in the pantry, but they are usually gone before I even remember they're there. I'm a sucker for a good piece of chocolate, and I love my Skittles, but typically don't buy them. I don't order dessert at restaurants. I do bake; cookies, cake, brownies, but the same applies - I usually forget I have them and then they're gone! We do love our salty snacks, but that's a story for another post...

Ok, so anyway, where I'm going with this...I've discovered a new love. Dump Cake. It sounds awful, it's not all that pretty to look at, and once you know the ingredients, you start having chest pains. But ohmygoodness it's so good! And there are so many ways to make it! Confession...we can eat a whole pan in less than three days.

The proof?
I baked this Sunday night, and Wednesday morning, this is what was left. From a 9x13 pan.

Here's the original recipe:

Dump Cake
1 can cherry pie filling
1 14 oz can crushed pineapple
1 box yellow cake mix
1 stick of butter or margarine

Preheat oven to 375. Spread cherry pie filling in the bottom of a 9x13 pan, then pineapple. Sprinkle cake mix evenly on top. Cut butter into about 12-14 even pieces (as even as possible) and spread evenly on top of cake mix. Bake for about 45 minutes.

It's good hot or cold. The key is to have enough of your wet ingredients on the bottom to help cook the cake mix.

Here's some variations I've tried:
Peach Cobbler - 1 large can sliced peaches, cake mix, butter, cinnamon
Raspberry Peach -1 can peaches, 1/2 pint fresh rasperberries (sprinkle with a little sugar and let sit to help bring the juices out), cake mix, butter (this is the one pictured above).

And here's a few I've found but have not yet tried.
Blueberry Dump Cake
Apple Spice Dump Cake
Black Forest Dump Cake
Alabama Mud Dump Cake

Or make your own variation with your favorite fruit.

I'm going to have to try the Alabama Mud next - I bet we could finish that pan in two days!!

Monday, May 3, 2010

Cranberry Apple Oatmeal Muffins

I have given up my morning Starbucks run. Mostly to save money, but I've actually been feeling better, without all that caffeine, and, um, cheese danish goodness. I did need to replace my morning breakfast routine though. I figured that I could probably make something just as tasty and satisfying as those huge, not-so-good-for-you muffins at Starbucks. And I found just the recipe! This could easily be modified to add your favorite dried fruit, nuts or flavored yogurt.

Cranberry Apple Oatmeal Muffins


Ingredients:
1 1/4 cup flour
3/4 cups quick cook oats
1 tsp. baking powder
1 tsp. baking soda
1/2 tsp. salt
1/2 cup firmly packed brown sugar
1 egg
2 Tbls vegetable oil
1 cup vanilla flavored non-fat yogurt
1/2 cup applesauce
1 tsp cinnamon
1 cup diced apples
1 cup dried cranberries

Preheat oven to 400 degrees. Stir together flour, oats, baking powder, soda, salt, cinnamon and sugar. In a seperate bowl, stir together egg, oil, yogurt and applesauce. Add to dry ingredients and mix just until batter is moisetened. Fold in cranberries and apples. Place in muffin cups (I used a cookie scoop). Bake at 400 degrees for about 20 to 25 minutes, until a tester inserted in the center comes out clean and dry. Cool.

This made 16 muffins, using two scoops of batter.

These were so good! Very sweet, moist and almost no fat. The man wasn't thrilled ("I'm not a fan of apples in my baked goods." Um, ok), but the boy loved them. In my opinion, you could even omit the oil all together or replace with a little extra applesauce. Yummy, filling, and good for you! Woo-hoo!

Monday, April 26, 2010

Blueberry Upside-Down Cake

Sunday is my stay at home day. At least that's what I try to do. I love being at home, doing the "mom" thing, laundry (yes, I said it), cleaning (ok, maybe notsomuch), preparing meals for the week, and baking. I try to bake one dessert on Sunday, that we can snack on throughout the week.

This weekend I decided to try a new recipe from Eat At Home. Have I mentioned that I love this website? There are lots of new recipe, and easy ones, to try out.

I thought this one sounded good, and looked good too. Here's the recipe as is. I'll add my variations in parenthesis.

Blueberry Upside-Down Cake


 Ingredients:
2 sticks butter, very soft at room temp

1 cup brown sugar
2 cups blueberries, fresh or frozen (if frozen, thaw and drain them) at room temp
1 cup white sugar
1 egg yolk, plus 2 whole eggs at room temp (I only had 2 egg, so added about a tablespoon of water instead)
2/3 cup sour cream
1 tsp. vanilla
1/2 tsp. salt
1 3/4 cup flour
1 tsp. baking powder
1/4 tsp. baking soda

1. Preheat oven to 350 degrees and put the rack in the lower third of the oven.


2. Lightly butter the bottom and sides of a 9″ cake pan that is at least 2 1/2″ deep (I used Pam).

3. Put 1 1/2 sticks of the butter in a large bowl. With a wooden spoon cream the butter with the white sugar and the egg yolk. Switch to a whisk and stir in the whole eggs one at a time. Whisk until the sugar begins to dissolve and the batter looks smooth. Mix in the sour cream, vanilla and salt.

4. Mix the flour, baking powder and baking soda in a seperate bowl, then add to the wet ingredients. Stir to combine. The batter will be satiny.

5. Put the 1/2 stick of butter in the pan and set it in the oven to melt. Pull it out and stir the brown sugar into it. Pat the mixture out in the bottom of the pan as evenly as you can. Put the berries on top of the brown sugar/butter mix. Pour the batter on top of the berries. Bake in the lower third of the oven for 50-60 minutes. Cool 5-10 minutes and then dump it out on a plate.

I think I was expecting something a little sweeter, or maybe richer. It tasted more like a coffee cake to me, or almost like a blueberry muffin. But it was definitely pretty, and tasted yummy!

Linking to Tempt My Tummy and Tuesdays at the Table


Photobucket

Tuesday, April 20, 2010

Cowboy Oatmeal Cookies

Cookies are a staple in my house. Everybody loves them, especially the homemade kind! I'm always on the lookout for new recipes and I try one pretty much every week.

I love chocolate chip cookies, and since we are trying to eat a bit healthier, I decided to go for the oatmeal variety. I found this recipe, and decided to give it a shot with some variations. I'll list the ingredients as they were stated in the recipe, and include my variations.

Cowboy Oatmeal Cookies

Ingredients:
2 cups flour
1/2 tsp baking powder
1 tsp baking soda
1/2 tsp salt
1/2 cup butter (I used applesauce)
1/2 cup oil (I used applesauce)
1 cup packed brown sugar
1 cup white sugar (I used 2/3)
2 eggs
2 cups quick cooking oats (I used 3)
1 cup butterscotch chips (I used chocolate)
*all ingredients should be at room temperature

1. Preheat the oven to 350 degrees. Sift together flour, baking powder, baking soda, and salt; set aside.

2. In a medium bowl, cream butter, oil (applesauce), brown sugar, and white sugar until smooth. Beat in eggs one at a time. Gradually stir in the sifted ingredients until well mixed. Mix in oats and chips.

the recipe calls for one cup of chips. I put in the cup, and then figured what the heck? if a cup is good, the whole bag is better right?!

Ok, back to our regularly scheduled program...

3. Drop from a teaspoon onto ungreased cookie sheets (I used a cookie scoop).


doesn't the batter look good? Yes, it tastes as good as it looks! Hi, my name is Kristin, and I'm a batter-aholic.

4. Bake for 10-12 minutes, or until edges are golden (it actually took about 14 minutes in my oven, but ovens do vary). Let set up on the cookie sheets for a few minutes before transferring to wire racks to cool completely.

What I would do differently:
  • These cookies are yummy, but are pretty sweet. I would definitely cut both sugars back next time, to 2/3 cup (or less) each. I didn't think about cutting back until I had already put in the brown sugar, or I would have used less of that as well.
  • Use less chocolate chips. My "if one cup is good..." philosophy didn't quite pan out this time. It was a bit too rich for my taste, and the chocolate kind of overpowered the cookie.
Aren't they gorgeous?


And wouldn't they go great with a nice tall glass of this?


'Til next time...

Photobucket

Saturday, April 17, 2010

Not Every Recipe Is a Good One

Wanting to eat healthy is a good thing, right?

Nod your head, smile.

Unfortunately, not every healthy recipe you may find, is a good one!

I found this recipe last night while trying to figure out what to do with the three bananas that were turning brown on my kitchen counter. I thought it sounded good, and the best part (since we're TRYING to be more health conscious) was that it had no sugar, no butter/oil, and no eggs. Sound tempting?

Now before you turn away, I must say that it actually did taste good. The consistency was not that of a normal "bread," (it was very moist and chewy). I let it go five minutes past the suggested time, but was afraid it would burn the top.

Anyway, here's the recipe. I might try and add a little more flour next time, and I would definitely puree the banana instead of mashing it. Like I said, the taste was good, so if you have any suggestions on how to improve the texture, I'm all ears!

(Healthy) Banana-Applesauce Bread
3 bananas (mashed with a fork)
1/4 cup applesauce
1/4 cup honey
1/2 cup water
2 cups flour
2 tsp cinnamon
1/2 tsp baking soda
2 tsp baking powder

Mix all ingredients together.


As you can see, I sorta mashed the banana, but figured I would just use my hand mixer and it would be ok. Typicall, I would get out my blender, add a little of the liquid, and puree. But I was being lazy. I think that would have really helped.

Next, pour into the prepared (sprayed with Pam) loaf pan.


Bake at 350 degrees for one hour. I actually added five minutes (not on purpose, I was busy).

Here's what it looked like when it came out of the oven:


And here's what it looked like after I let it cool for ten minutes, then took it out of the pan:


Oops! It fell a bit. But, still sorta tasty! :)

Here's what I would do differently:
1) Puree the banana, with a little of the water, in the blender till smooth.
2) Mix with a spoon, not a hand mixer.
3) Add maybe a 1/4 cup more flour.
4) Cook a tad bit longer.

If you have any suggestions on how to make this a better recipe, I'd love to hear it!