Betty Crocker Wannabe has MOVED! I am now blogging solely at A Simply Klassic Home. I am still sharing printables, party ideas, and other inspiration. It's much more streamlined and clean. I hope you will stop by and say follow along there! I have lots of ideas for new printables coming this holiday season!!
Showing posts with label My Home. Show all posts

Tuesday, January 18, 2011

I Got Motivated!!!

Thank you to everyone for your sweet comments and emails about my last post. I'm feeling better, and even had a burst of motivation last night to finally get my pantry organized.

And I did!

It's not 100% where I want it to be, but it's a good solid start to getting my kitchen into an organized kitchen that will work with me instead of against me.

If you've been following for a while, you know that my home belonged to my grandparents before they died. So I basically grew up in this house. My grandmother was the kind of person who had a place for everything, and everything in it's place, even if it made no sense to anyone else.

When I moved in, I had a hard time visualizing any other way of storage and organization. Cereal was in the bottom cabinet to the right of the stove. Pasta and spices in the top cabinet to the left of the stove. Canned soup and veggies in the top right. Even my drawers were the same. But after three years of living in this house, I decided it was time to make some changes. Now, they may not seem major to anyone else, but they are huge to me.

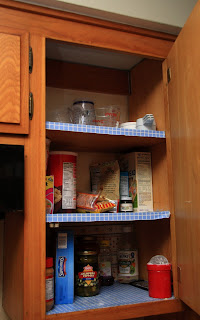
Here's the pantry before:


And here are the other cabinets that are going to be organized. A lot of what's in them will be moving to the pantry.


I have a very large pantry, but it really wasn't set up in a way that made the best use of the space, so I moved some of the shelving around. It's so deep that it's hard to see what you really have. Perhaps the reason I have eight bags of chocolate chips, five of them half empty.


I took everything out of the pantry and the cabinets, and set it on the kitchen counters.

The cabinet is somewhat custom, as my grandfather installed it and didn't glue in or tack down any of the shelving. So it was all very easy to move around.

Here's what it looks like now:


I have a ton of Tupperware (I used to be a consultant), and I love my Modular Mates. I also used a bunch of $1 shoeboxes that were on sale at Target last week.

I still need to make labels, and I would really love to get rid of that ugly shelf paper and paint it...but I think that may be a little too ambitious for me right now. I'm just happy everything is in one place. I'm considering taking the doors off, since this is just a former laundry and it's closed off from the other rooms in the house. What do you think? Doors? or No doors?

Tomorrow I will be working on the rest of the kitchen. If I'm still motivated!

Special thanks to my bloggy buddy Gwen, who, even though she doesn't know it, inspired me to get busy with her sewing closet makeover. It's seriously awesome. I just finished Gwen's blog makeover, so stop by and check it out!

Do you want to win a FREE BLOG MAKEOVER? Enter the Blog Makeover Giveaway! Ends Friday (1/21/11) at 11:59 pm PST.

Wednesday, January 5, 2011

Decorating with Vintage Cameras

Once the Christmas decor came down, the top of my dining room hutch, which was filled with poinsettias just a few days ago, was looking mighty empty. It was time to change things up a bit.
I became inspired after seeing this photo in the latest Pottery Barn catalog (I'm really bummed, because you can't really see the top, but trust me, those are cameras).


Rick had a couple of old cameras, and I had some camera equipment that belonged to my grandparents in the 50s, so we thought there was enough to fill up the space above the hutch.

I added some old photographs and an old Disney movie reel (the only thing we purchased - found at Country Roads in Old Towne Orange for $9) and the vignette was complete.


(Clockwise from the left - my grandparents wedding photo from 1949, a baby photo of my dad from 1938, a photo of my dad and my grandmother from 1940, and my parents wedding photo from 1974)


From the left: Kodak movie projector & movie camera from the 50s, stack of film reels with old movies, including family trips to Knott's Berry Farm and Disneyland in the mid-50s, movie reel with old photographs, two vintage cameras that Rick had, and a 1940s vintage camera from Germany on a tripod.


Now, I must give credit where credit is due...the photographs were Rick's idea. Yeah, I think I'll keep him.

The hutch belonged to my grandparents, too. It kind of came with the house. Mostly because it's just too dang big to get rid of. And I kind of like it.

Because of the ceiling fan, and the fact that it was 11:00 at night, made photographing very difficult, but I am so pleased with how it turned out, that I just had to share.


What do you think?

Sunday, November 28, 2010

Our Christmas Mantel

We spent this Thanksgiving weekend like we always do...decorating for Christmas!!

I have never liked my fireplace, but I am absolutely in love with how my Christmas mantel turned out this year! Everything seems to flow, and it just makes me happy looking at it!


We've recently found out that Cooper has many allergies including many trees and grasses, so didn't want to take the chance with a real tree, or having any pine branches in the house. I used faux lighted greenery, but I love the little twinkle it adds, even during daylight.


I used the winning combination of mason jar/epsom salt/candles again, and added some small gold mercury glass tealight holders on different candle holders for some height. The bronze stars all came from Michaels.


These beautiful, large (and heavy) glass ornaments came from Marshalls last year.


I have a pretty porcelain Nativity that will probably not see the light of day for several more years, since I really don't trust my three year old around it. So, we have this super cute Little People Nativity from Fisher Price.


I made this banner in Photoshop, just like the Peace on Earth banner. I was going to be offering these as printables, so as soon as I have the time to figure out how to do that, I will let you know!

So there's my mantel. I just love how it looks at night, too!


I will be sharing my tree later this week, as well as my favorite ornaments, once I'm certain it's finished, that is! AND hopefully later this week my oven will be fixed so I can start sharing my favorite cookie recipes!!!

Thanks for visiting today, and I hope you'll be back soon! Make sure to stop by Gwenny Penny all this week and next for Haul Out the Holly. Gwen will be featuring different bloggers each day, and I'm one of them!!

I'm linking my mantel up with Layla over at The Lettered Cottage, and I'm looking forward to see what others have done with their mantels as well.

Also linking up to these great parties.

Saturday, November 20, 2010

I Was a Dollar Store Snob

My name is Kristin, and I am a Dollar Store snob. Or I was, at least, until I started blogging.

I have found such great inspiration on so many blogs with items found at the Goodwill or purchased at the Dollar Store, that I have turned my loathing of the Dollar Tree into love. Well, "like" at least...I'm still in recovery.

***WARNING, if you are one of those people who do not believe in putting up your Christmas decorations before Thanksgiving, please avert your eyes.***

I am aiming to have a simpler Christmas this year, with decorations as well as gifts. I would also like to have a little bit of Christmas in the majority of the rooms in our house. I have a very small budget this year, so I'm spreading out decor I already have or re-purposing items I have on hand.

 (looking at the photo, I should probably have taken the pictures down, but I was too lazy to go back and shoot more photos)

When I saw this sweet little tinsel tree in the Dollar Spot at Target, I knew exactly what I would do with it.


I fluffed it up, and straightened the branches. I place it in a burlap covered flower pot (stuffed some newspaper on the bottom), and covered the styrofoam with a little shredded brown crinkle paper and some silver tinsel. For the finishing touch, I tied a red gingham ribbon around the pot.


They also had tubes of ornaments for a dollar. I bought seven tubes, in various sizes and textures, and used three and a half of them here in a glass vase.


I read a post on The Inspired Room the other day about decorating with mason jars. I love mason jars, and this is something I've been wanting to do.


I filled the jars with Epsom salt and stuck a votive candle in - instant sparkle! I wanted to tie something around the jars, but haven't yet decided what that should be...ribbon, or twine, or just leave them as is...what do you think?


I created the "Peace on Earth" banner in Photoshop. I have a Joy to the World version that will be displayed on my mantle.


So there it is, a little bit of Christmas decor on the cheap.

  (He reeeeally wanted to be in a picture. He does make a great model, doesn't he?)


Cost breakdown:
Tinsel tree: $2.50 at Target
Ornaments: $1 a tube at Target
Flower pot with burlap: on hand
Ribbon: leftover from the Grandma-to-be-Party
Epsom salt: $3 for a large bag
Votives: 50 cents a piece
Banner: made by me in Photoshop

It's beginning to look a lot like Christmas...

I have an awesome, cheap, and easy gift idea coming this week. Can you guess what it is?

Thursday, November 4, 2010

Pottery Barn Inspired Empty Frame Art & Card Display

I think we have created a monster.

I picked up a paintbrush for the first time in years. And I liked it. a lot. In fact, I've been wandering the halls of my house warning the mismatched picture frames that they're next.

As soon as I saw the Pottery Barn catalog that came out a few weeks ago, I started ripping pictures from it, storing ideas of things I wanted to knock-off for Christmas decor. I shared some of those ideas here.

This was one of them:


But with a hefty $200 price tag, I knew it was something I would never own. Then I looked to my right and saw a picture frame hanging on the wall. Sure, it had a picture in it, but this frame was just begging to be transformed. So I did.


I am so excited about how this project turned out. It's the first "big" project I've taken on in a long time.

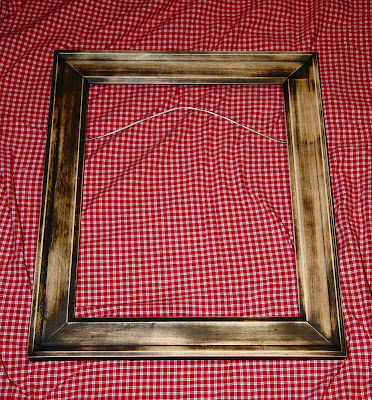
Here's the original 16" x 20" frame:


First I sanded it down, not wanting to completely lose the dark color.


Next, I painted the frame Cottage White. I used a couple coats of Behr's Primer Paint (I actually bought a sample size for $2.94) and it worked great!


Once it was dry, I distressed the frame using both coarse and medium sandpaper.


Then I was ready to attach the wires. I purchased a picture hook kit at Home Depot that included picture wire, sawtooth hangers, picture hooks, and screw eyes for around $4.

I screwed in the eyes evenly spaced on the back of the frame.


Then I doubled up the picture wire, looped it through the eye and twisted it to secure it, making sure to hold it as tight as possible.


I kept the original hanger, and just screwed it back into the frame high enough and tight enough that once it was hanging it wouldn't be seen.


I hung it on the wall, and stood back to admire my work!


The entire project cost me about $7 for the paint and the picture hook kit. That's $193 cheaper than Pottery Barn!!

My original intention was to use it to display Christmas cards.


But then I thought it might be a great thing to leave up year round to use as holiday decor throughout the seasons.


I think that my favorite idea though, is to just hang a few black & whites on it.


What would you display?

Make sure to check back on 11/11 when I'll be posting a GIVEAWAY for personalized printables!


Linking to these great parties!

Thursday, August 19, 2010

Purging, Organizing, and Basic Housekeeping Routines That Make Me Happy

Do you ever feel overwhelmed with all the work that needs to be done? You work all day, or are with the kids all day, and come home to a messy house, dinner that needs cooking, dishes that need done, baths that need to be taken, floors need swept, laundry, and the list goes on. Oh, and let's not a child/children and significant other who require your constant attention. I have been feeling overwhelmed quite a bit lately; I look around my house and I just want to cry because nothing is perfect.

But here's what I have learned: It doesn't have to be perfect. It doesn't have to look like all of those beautiful homes we see photos of on blogs every day. No one's home looks like that all of the time. It's called STAGING.

I need to start learning to be happy with my home just like it is. There are a few things I can do to make that happen.

Here are my goals:
1. Purge: I've read a few suggestions on ways to go about this-
- Throw out (trash, donate or garage sale) five things each day.
- Spend 30 minutes going room to room filling a large trash bag. This is for trash only. You can set aside items to donate, but focus mainly on items that won't be reusable. The hardest part - don't think about it, just do it! Set a timer for 30 minutes to help keep you going. Then go back in a week or so and do the same with donations.
- Just go for it. Go room to room, spend hours, or days if you need to.
I think the first two sound pretty doable. I think I'm going to shoot for the second.

2. Organize
Work on one room per week, sorting, organizing, planning each room out. This may require purchasing tools such as boxes and bags, but I'm aiming to keep this a no cost activity. It doesn't have to look "cute" just organized!

I'm giving myself one month to get organized.

I already have several ideas for certain spaces, like the laundry room and pantry, to help keep them organized, but first the purging!

I also have daily goals. There are a few basic housekeeping routines I do each day to help keep my house lookng neat, even when I feel like it's a mess. Alltogether it takes about 30 minutes. And that's something I can live with.

1. Tidy up the Living Room - 5 minutes
Because in order for it to look like this,


I must do this:


I love the idea of having a large basket hidden away that I can toss all of my son's crap beloved toys in. We have a rather large playroom, but somehow toys always make their way into the common areas. Hmmmm...

I also fluff up the pillows.

2. Tidy up the kitchen - 15 minutes
I love waking up to a clean kitchen. It helps give me a fresh start each day. I make sure the dishes are done, dishwasher loaded, counter and stove wiped down, and the sink is clean. I also attempt to declutter the countertops, because it's amazing what accumulates there in a day!

3. Make the Bed - 2 minutes
This should be a no brainer! Having a freshly made bed makes walking into the bedroom so much more inviting and pleasant.


4. Room by room cleaning frenzy (adapted form the Inspired Room) - 10 minutes
I go room to room, picking up dirty clothes, and random misc. items and either returning them to the spot or at least the room they belong in.

Just spending 30 minutes doing these few things each night helps to make my home feel less cluttered and messy, and just makes me happier in general.

Do you have any basic housekeeping routines that help keep you sane?

I've got my evening routines down, and next week starts the purging...wish me luck!

Sunday, August 15, 2010

The Big Boy Room Reveal

Cooper moved into a big boy bed in February, and I *FINALLY* finished it!!

Here's what we started with:


 A not so eclectic mix of whatever.


And woods that didn't really match.

We needed two beds as Gracie, Rick's daughter, is with us on weekends. This posed a bit of a dilemma since the room couldn't be too much "boy" because a little girl would be sharing it.

I decided I would start with the bedding.

After much, much blog and web surfing I settled on bedding from Pottery Barn Kids. This was definitely a splurge, but so worth it. Their coordinating "Morgan" bedding made it easy to mix and match a quilt for Cooper, and a duvet for Gracie, since we already had a comforter for her. The sheets are PBK "Bedtime Stories" with animals reading story books - too cute!

And here's the finished space!


(Sorry I had to leave the railing on the bed...it's just too much of a pain to put back up!!)


The curtains behind the beds add great texture and height. Doesn't hurt that they were on 80% clearance at JCPenney! Yup, that's right, the curtains were under $10 per set! They also help to cover up the ugly blinds. Thanks to Wendy at The Shabby Nest for the great ideas!

The artwork above the beds is from Tiddliwink Designs, where you can find affordable PBK coordinating artwork. It was just $20 for four 8x10 prints! She designed it specifically at my request, since she didn't have the Bedtime Stories line on her website.


I made the headboards myself with fabric and batting from Joann's (love that 40% off coupon!) and pieces of plywood that I had cut at Home Depot.


The dresser was a Country Roads find, from my friend Kate's space. I love the element of shabbiness it adds to all of the new pieces in the room.

The lamp is another PBK piece, purchased with a gift card after Cooper arrived.


The "Wish" sign was on clearance at Marshall's.


All you Mommies know how much artwork comes home with your kids. Well, I've seen many ideas for how to display them out there in the bloggy world, but I decided to work with what I had on hand.

Nails, twine and clothespins. Works for me!


I also found these cute hooks at Ikea for $4. Perfect for hats and backpacks.


Now, for the best part of the room.

I present...

The reading corner!


This is my absolute favorite part of the room!!!

I wanted to keep with the Bedtime Stories theme, and since we have so many books (this is only half of our stash) I wanted a reading corner.

The shelving unit is from Ikea, and was incredibly easy to put together. The green chair was a gift card purchase from PBK. The Stitch artwork was a splurge from Disneyland right after Cooper came home...it has special meaning to me with the adoption theme. And of course since Stitch is reading a book, it fits in with my room theme as well!


The rocking chair was mine when I was little, made by my grandfather when I was just a year old.

And the tree, oh yes, the tree.

A few months ago Gracie told me we needed a tree. I finally obliged!


I work for a church, and last week was VBS. The African theme was "Under the Baobab Tree" and our fantastic youth group created these amazing trees to decorate our campus. I called dibs on a few of the branches and part of a trunk on the first day! It's just crumpled brown kraft paper, a little brown paint and strips of green tulle tied to the branches.

Cooper was beyond excited. As I was stapling the branches up (yup, staple gunned to the walls and the ceiling), he was running up and down the hall yelling "Thank you! Thank you!" Not bad - an unpromted thank you from my three year old!

So there it is, Cooper's Big Boy Room! What do you think?

Before:


After!